Color theme generation from images using k-means

Note, this post more or less follows this post by Charles Leifer, except in less detail, and explained more poorly.

One of the top posts on the unixporn subreddit (SFW, really.) is this post that shows how a redditor generates color themes for his window manager from images using a script. He gets the code from Charles Leifer, who explains how the script works. Basically, the script detects the dominant colors in the image using k-means clustering.

As an exercise, I tried recreating the script in R. I didn’t exactly look at Charles’ code, but I knew the basic premise was that it uses k-means to generate a color palette.

I liked the idea of using R over Python because (a) as a statistics major I use R all the time and (b) there’s no other reason, R’s just fairly nice to work with.

Color spaces

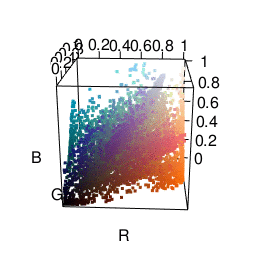
k-means performs differently depending on how you represent colors. A common color space to use is RGB, which represents colors by their red, green, and blue components. I found that representing colors in this manner tended to result in points along the diagonal. This happens since images usually have many shades of the same color, so, if you have $(r, g, b)$ you also tend to have $(r+10, g+10, b+10)$. This results in clusters having a sort of elongated shape, which isn’t that great for k-means since it seems better at picking out more “round” clusters. There is often a lot of correlation between dimensions. Maybe I’m not making a lot of sense here, suffice to say I wasn’t terribly pleased with the clusters I was getting.

A 3 dimensional representation of the colors used in an image. In RGB space.

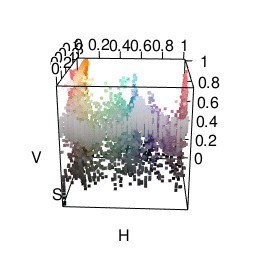
The next color space I tried was HSV, which represents colors in terms of hue, saturation, and value. This actually got me some fairly satisfactory clusters. As you can see in the graphic below, it’s much easier to separate different colors. The only problem was that it made me want to put more weight on the “hue” dimension than the “saturation” or “value” dimensions. Many clusters ended up just being gray.

A 3 dimensional representation of colors in the same image, but in HSV space.

One cool thing is that R already does HSV fairly easily using the rgb2hsv function.

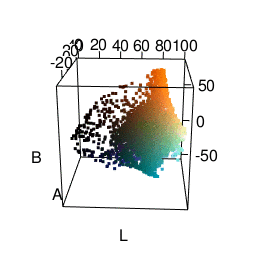
I was most satisfied using LAB space. This represents colors with one “lightness” dimension and two color dimensions “A” and “B”. It was made to approximate human vision, and as you can see from the graphic below, distances between colors seem more meaningful. In fact, using Lab space is a recommended way of finding color difference. A good package for using this in R is the colorspace package.

Colors represented in LAB space.

k-means

Another nice thing about R is that it has its own kmeans function built in. I actually tried writing my own, which looks like this:

## Do k-Means
## It tends to lose some k values
kMeans <- function(k, X, iter = 5) {
    ## Assign random membership
    membership <<- sample(1:k, size=nrow(X), replace=TRUE)

    for(i in 1:iter) {
    mus <<- tapply(1:nrow(X), membership, function(x) colMeans(X[x,,drop=FALSE]), simplify=FALSE)
    dd <<- do.call(cbind, lapply(mus, function(mu) rowSums((matrix(mu, byrow=TRUE,nrow=nrow(X), ncol=length(mu)) - X)^2)))
    newmembership <<- apply(dd, 1, which.min)
    if(all(newmembership == membership))
        break
    membership <<- newmembership
    }
    list(mus = mus, membership = membership)
}

Unfortunately it’s liable to return fewer clusters than requested. I think what’s going on is that in some iterations no points are closest to a specific cluster, so it’s lost. Perhaps there’s a bug somewhere I need to fix. Anyway, I ended up using the kmeans function instead.

It may be interesting to use other clustering techniques. I use k-means here only because it’s relatively easy to use. However, I would like to try distribution-based clustering at some point.

From clusters to palette

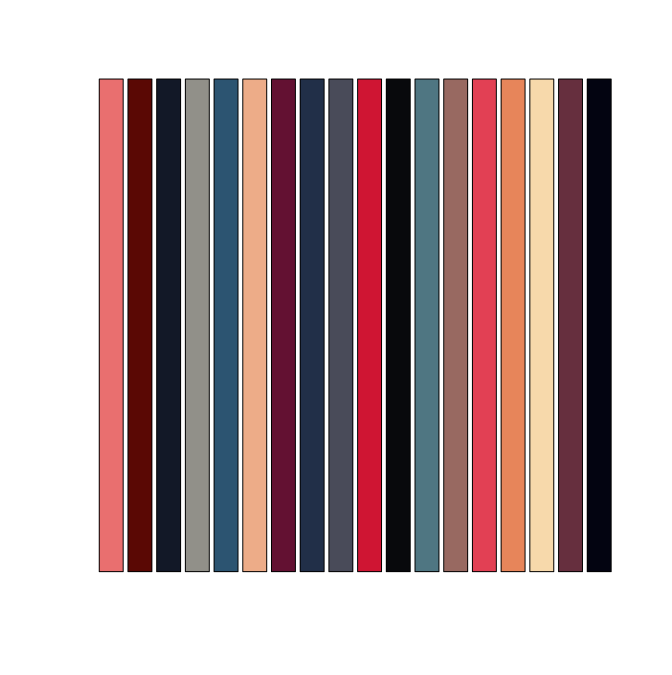
Going from a list of colors to a palette configuration also requires some special thought. Given a list of colors like below, how do we pick which ones become a foreground color, background color, etc?

Colors selected for the palette by the script.

We’d like our foreground and background colors in xterm to be chosen so they have a lot of contrast. This is where Lab space is very convenient: color difference is calculated just using Euclidean distance. We can then use the dist function in R to directly create a distance matrix from our color clusters represented in LAB form.

The way I ended up generating a palette was doing the following:

  1. For the background color, take the first cluster (which is most represented color in the image). Then find the most different color for the foreground color.
  2. With remaining colors, find pairs of colors that are very similar. The first in the pair gets set as something like color0 while the second gets set to color8.

Doing this, we end up getting a fairly nice palette from an image.

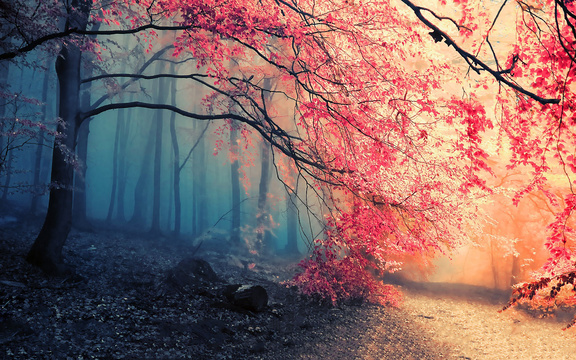
Here’s an example image used:

The example image used to generate the palette.

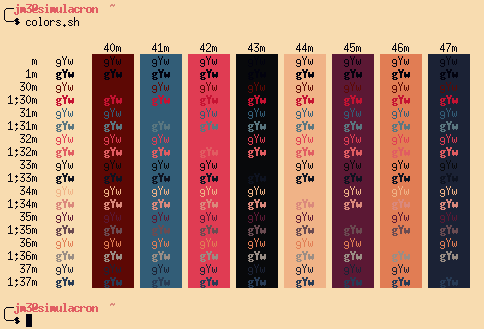
And how it ends up looking in xterm:

The generated color palette applied to xterm.

The actual code

Here’s all the actual code I used. It’s an Rscript that takes in a JPEG file as an argument and creates and xterm palette.

Emacs is great for sysadmins, too

I work as a Unix Systems Administrator for UC Berkeley’s Rescomp and it occasionally comes up that sysadmins generally prefer vim while programmers prefer Emacs. The reasoning for this is that vim or vi is generally more available on servers and generally has a more consistent interface across servers. That is, if you use Emacs, you generally have a hefty .emacs file, and using an unconfigured Emacs is painful.

I think it’s no longer the case that Emacs isn’t installed by default. I’ve only ever had to use vim a handful of times, and the only thing I really needed to know was how to

  1. Insert text (i)
  2. Save & Exit (Esc : wq ENTER)

However, I’m a sysadmin that prefers Emacs, and there are a number of reasons why using Emacs is very helpful for sysadminning.

Dired

Dired mode is Emacs’s visual “directory editor”, and it makes navigating and operating on files much easier than just using the command line.

Using marks

One task that’s very easy in Dired that’s really cumbersome to do elsewhere is repeated grepping. Say, for example, that I want to find files with “hello” in them. In Dired I do this by pressing % g and entering the string.

A number of files displayed in Dired.

And what I get is a number of marked files (in orange), that I can easily, among other things:

  • copy (C)
  • move/rename (R) (even to another server with Tramp!)
  • change the mode of (M)
  • run a shell command on (!)

Highlighting files to perform actions on them.

Now I can filter out files that don’t match by pressing t k (which toggles, then kills lines).

Filtering out a file by "killing" lines.

Now say I forgot that I also need the files to contain “world” somewhere in them. I just repeat the process by pressing % g again and entering “world” to get a list of marked files that contain both “hello” and “world”.

Searching with dired highlights files.

And now it’s really easy to do any operations on them.

In bash, however, it feels a little more clumsy for me. It’s possible to search by doing:

grep -l "hello" .

But if I remember later that it also has to contain “world”, I have to go edit the last command to be:

grep -lr hello . | xargs grep -l world

And now I just get a list of files. Say now that I want to copy these files somewhere. I have to again tack on another command, like so:

grep -lr hello . | xargs grep -l world | xargs -n1 -i cp {} /some/directory

It gets really cumbersome, and it requires you to remember how to use substitute arguments like {} in xargs. And you might also have to hope your file names don’t contain whitespace. With Dired, you really don’t have to worry about these kinds of things. Dired’s marking system makes a bunch of operations super convenient.

Edit Dired

“Edit Dired” mode also just makes it so much easier to rename files in bulk. Instead of having to think of a regexp or sed expression to use for rename or whatever, I can just use C-x C-q, define a macro (or use query-replace) , and save the buffer. Dired automatically does all the renaming for you.

Make the Dired editable by pressing C-x C-q:

Dired allows direct editing of file names.

Create a macro to rename files (or use query-replace):

Typing new file names in Dired.

Apply to all files, then save the buffer:

Using a macro to rename files.

Dired X

Dired X is also very useful. You load it by putting

(require 'dired-x)

in your .emacs

One of the cool things it can do is automatically guess the shell command you want to perform on a file. Say that I’ve forgotten the command to extract a .tar.gz file. Well, Dired X will remember for me!

Dired-X shows useful command suggestions for a ".tar.gz" file.

As you can see, it correctly suggests tar zxvf. Quite handy, huh?

Tramp

Tramp mode, combined with Dired, also just makes it really easy to move files around. I can browse directories on a remote server and say to myself “I’d like to have that locally” and copy it very quickly to my computer, without having to type scp and enter in the entire path. Another situation where this is useful is copying a file between two servers that have a firewall between each other. And this has actually happened for me on several occasions. Normally what I have to do is something like:

scp server1:/path/to/file .
scp file server2:/path/to/file
rm file

But with Tramp mode I can just copy it, quickly changing the server name in /ssh:server1:/path/to/file to /ssh:server2:/path/to/file

Tramp also makes it really easy to view images and PDFs on remote servers that don’t have X11, since Emacs can display images and PDFs.

It’s even possible to remotely edit files as root using /sudo:server:/path/to/file, although this doesn’t work out of the box. You’ll need to add this to your .emacs

(add-to-list 'tramp-default-proxies-alist 
     '((and (string-match system-name 
                  (tramp-file-name-host (car target-alist)))
            "THISSHOULDNEVERMATCH")
       "\\`root\\'" "/ssh:%h:"))

This allows you to sudo into remote servers, but also prevents it from interfering with sudoing locally.

I can also use M-x ediff to compare two files on different servers, and selectively merge differences.


So these are just a few reasons why Emacs can come in handy for a sysadmin, or any normal user for that matter. Tramp in conjunction with Dired make it extremely easy to handle files on a number of servers.

Adding template pages to Pelican

I was having a lot of trouble just getting my site to generate an authors file, even though I’m the only author here. The pelican documentation says you can add something like

AUTHORS_URL = 'blog/authors.html'
AUTHORS_SAVE_AS = 'blog/authors.html'

To generate the authors.html file.

It wasn’t working for me. Well, after going through the source code and finding the relevant section in generators.py I found that you have to set DIRECT_TEMPLATES like so:

DIRECT_TEMPLATES = ('index', 'tags', 'categories', 'archives', 'authors')
AUTHORS_URL = 'blog/authors.html'
AUTHORS_SAVE_AS = 'blog/authors.html'

Now it works! And looking back at the documentation, it actually sort of hints at this. D’oh!

Getting LaTeX Math to work in Pelican

Basically, you can follow this post verbatim.

I’ll just explain how I got to work on my personal setup. First of all, in order to do this you’ll need to edit your template. I have a copy of the “notmyidea” template in my blog directory, so I can make changes to it. You can copy /usr/share/pyshared/pelican/themes/notmyidea to your blog directory, for example if my pelican files live in ~/blog/ I’d copy notmyidea to ~/blog/themes/notmyidea. Now you’ll need to tell Pelican where to look for your theme, you can do this by editing your pelicanconf.py to include:

THEME = "themes/notmyidea"
THEME_STATIC_DIR = "theme"
THEME_STATIC_PATHS = ['static']
CSS_FILE = "main.css"

Now, in blog/themes/notmyidea/templates/base.html you’ll need to add

<!-- Using MathJax, with the delimiters $ -->
<!-- Conflict with pygments for the .mo and .mi -->
<script type="text/x-mathjax-config">
  MathJax.Hub.Config({
  "HTML-CSS": {
  styles: {
  ".MathJax .mo, .MathJax .mi": {color: "black ! important"}}
  },
  tex2jax: {inlineMath: [['$','$'], ['\\\\(','\\\\)']],processEscapes: true}
  });
</script>

<script type="text/javascript" src="//cdn.mathjax.org/mathjax/latest/MathJax.js?config=TeX-AMS_HTML"></script>

in the <head> section.

Now that you have this done, you should be able to start using inline equations using \$a^{\\beta}\$ to get $a^{\\beta}$ (note the double backslash).

I was having problems, however, getting the math directive to work with MathJax. What was happening was that instead of creating a <div class="math"> for the mathblock, RST was parsing the $\LaTeX$ as HTML. In order to fix this, you need to edit your docutils settings, as documented here. I did this by having a docutils.conf in my ~/blog folder with the following contents:

[html4css1 writer]
math_output: MathJax

Now

.. math::

   \frac{1}{\sqrt{2\pi\sigma^2}}\operatorname{exp}\left\{-\frac{\left(x-\mu\right)^2}{2\sigma^2}\right\}

Outputs to:

\[\frac{1}{\sqrt{2\pi\sigma^2}}\operatorname{exp}\left\{-\frac{\left(x-\mu\right)^2}{2\sigma^2}\right\}\]

Yay!