 Josh Moller-Mara
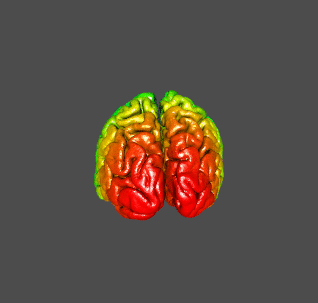
In one of my posts I talked about using rendering brain volumes in-browser using XTK. The results, I’ll admit, weren’t spectacular. The volume rendering didn’t really give very defined edges. But now I’ll show a couple methods of rendering a brain using Blender. The first method is using volumetric data in Blender, and the second uses surfaces generated by FreeSurfer. I think it gives pretty cool results, check it out below.
Above is Colin 27 average brain that comes included with AFNI as “MNIa_caez_colin27_t1_18+tlrc”.
Blender takes in different formats for its voxel data, and the type that was easiest for me to work with is the image sequence. Basically you just need to get a bunch of JPEGs of each slice from your voxels. And here’s an easy way to do this with AFNI:
#!/bin/bash

afni -com 'OPEN_WINDOW A.axialimage'             \
     -com 'SET_XHAIRS OFF'                       \
     -com "SAVE_ALLJPEG A.axialimage $2 "\
     -com 'QUIT'                                 \
     "$1"
You just supply the shell script the volume name and a base name, like “stuff”.
From there, I just followed some YouTube Blender tutorials (like this one) for how to render voxel data. Briefly, though, here are the steps:
- Edit the material for the default cube and select “Volume”.
- Change “Density” to 0, as you’ll have the voxel data supply the density for you.
- Then go into the texture editor and use a “Voxel Data” type, and you’ll have “Influence” only set to “Density”, which you’ll set to some high number like 200. This means that higher-signal voxels (like those that are whiter), will appear more dense.
- You may need to mess around with the ramping, too, if you’re getting random particles outside the brain. The preview in the material panel should help a lot for this.
- Also in the material panel, you’ll want to set “Step size” fairly small, so you get a bunch more particles which look nicer.
- Finally, set the amount of light your lamp gives to a fairly high number.
Method 2, Freesurfer surfaces and OBJ files
The second way you can visualize the brain is by having FreeSurfer do the surface construction for you.
Here’s how to take the Colin brain and create a cortical surface using FreeSurfer. Warning: It will take a really long time.
3dAFNItoNIFTI MNIa_caez_colin27_T1_18+tlrc
mkdir -p MYSUBJ/mri/orig
export SUBJECTS_DIR=`pwd`
source ~/freesurfer/SetUpFreeSurfer.sh   # Or wherever you store it
mri_convert MNIa_caez_colin27_T1_18.nii MYSUBJ/mri/orig/001.mgz
recon-all -s MYSUBJ -autorecon-all
This just does all the FreeSurfer steps, which is overkill and takes several hours to complete. You could, though, read this page to find the necessary steps to just create “lh.pial”. Also check out these flags that you can pass to recon-all.
I should note at this point that the rest of this post is basically just a knock-off of this post. Anderson has a great gawk script that converts FreeSurfer ASCII to obj included in his post, so check it out.
Anyway, once you have lh.pial, you’ll first need to an ASCII format using mris_convert lh.pial lh.pial.asc. mris_convert is included with FreeSurfer, so you’ll need to source your FreeSurfer setup script.
Once you have the ASCII format version, you’ll need to convert it into a Wavefront OBJ, so Blender can import it. Again, Anderson Winkler has a much better, faster, and simpler script than I have for converting .asc files to .obj. My script (also see the gist below) does the same thing, but slower, and in R. The plus side, though, is that it’ll preview the surfaces using rgl.
Ooh. Fancy.
From there it’s fairly straightforward to import into Blender, and do whatever you want with it. Here’s a simple animation of a FreeSurfer surface rendered in Blender.